If you’re getting started with DIY projects or home renovations, an angle grinder is easily one of the most versatile power tools you can own. This handheld device can cut, grind, sand, and polish a variety of materials, including metal, concrete, and tile.
However, if you’ve never used one before, an angle grinder might seem a little intimidating. This guide will walk you through how to use an angle grinder safely and effectively, so even if you’re a complete beginner, you can handle it with confidence.
What Is an Angle Grinder?
An angle grinder is a high-speed rotary tool designed for multi-purpose use. Compact and handheld, it features a powerful motor that spins a disc (called a wheel) at high speed. The type of disc you attach determines what job it can do:
- Cutting metal pipes, rebar, tile, or concrete
- Smoothing rough welds or sharp metal edges
- Removing rust and paint
- Polishing metal surfaces
- Sharpening tools like lawnmower blades or axes
Common Types of Angle Grinder Attachments
The discs and attachments you use dictate your angle grinder’s capabilities. Here are five of the most common:
- Grinding wheels: Made from tough abrasives, these are used for smoothing metal, removing welds, or shaping stone and concrete.
- Cutting discs: Thin and sharp, designed to slice through metal, bolts, rebar, tile, or stone—usually reinforced with fiberglass.
- Sanding pads: Sandpaper sheets attached to a rubber backing pad, ideal for woodworking, paint removal, or finishing surfaces.
- Wire brush wheels: Densely packed wire bristles for cleaning rust, old paint, or stubborn grime.
- Polishing pads: Typically felt, wool, or foam, used with polishing compound to bring a shine back to metal or stone.
Each disc’s packaging will list its type, size, and compatible materials. Choose accordingly for your grinder and the job at hand.
How to Change Angle Grinder Attachments
Changing attachments is quick and easy with a little practice—often under a minute:
Disconnect the power
Before touching any part of the grinder, unplug it (or remove the battery). Even if the switch is off, never assume it’s safe until it’s physically disconnected.
Lock the spindle
Most angle grinders have a spindle lock button, usually on top of the gear housing. Press and hold this button. You’ll feel the spindle lock into place, keeping the disc from spinning.
Loosen the flange nut with the wrench
Insert the pins of the wrench into the holes on the flange nut. Hold the spindle lock and turn the wrench counterclockwise to loosen the nut.
Remove the old disc
After removing the flange nut, lift the disc straight up off the spindle. Inspect it for damage before discarding or storing safely.
Install the new disc
Place the new disc onto the spindle. Pay attention to the direction—some discs have a label that should face outward. Make sure it lies flat and centered.
Reinstall and tighten the flange nut
Thread the flange nut back onto the spindle by hand. Hold the spindle lock and snug it down with the wrench—don’t overtighten. Too much torque can crack the disc or make future removal difficult.
Check for proper fit
Before powering on, spin the disc by hand. It should turn freely without wobbling, sticking, or touching the guard.
Safety and Preparation Before Using Angle Grinder
Safety always comes first. An angle grinder isn’t a tool to “wing it” with. Every operation involves high-speed friction, flying sparks, and sharp spinning discs. With a bit of prep, you’ll avoid painful—and potentially costly—mistakes.
1. Wear Personal Protective Equipment (PPE)
Before you hit the switch, suit up with the right gear:
- Safety goggles or a face shield to guard your eyes from sparks and flying debris.
- Earplugs or earmuffs—angle grinders are loud, especially in enclosed spaces.
- Work gloves to protect your hands from heat, fragments, and vibration.
- Dust mask or respirator if you’re cutting or grinding materials that create dust (like metal or concrete).
- Long sleeves and work pants, preferably flame-resistant.
Never wear loose clothing, jewelry, or anything that could get caught in the tool.
2. Inspect Your Tool and Disc
- Always disconnect power or remove the battery before inspection.
- Check the disc for cracks, chips, or warping—even small flaws can cause a disc to shatter at speed.
- Ensure the disc’s rated RPM matches or exceeds your grinder’s max speed (these specs are printed on both the disc and the machine).
- Use the correct wrench to make sure the disc is securely tightened—no wobble, no looseness.
- Adjust the safety guard to shield yourself from sparks, but without blocking your view.
3. Prepare Your Workspace
- Keep your area clean, dry, and well-lit.
- Remove all flammable materials—the grinder throws off plenty of sparks.
- Use clamps or a vise to secure your workpiece; never hold it by hand.
- Plan where sparks will fly—make sure they won’t hit you, your tools, or others.
Spending an extra five minutes on prep is always worth it. It’s not just about safety; it sets the stage for a smooth, productive job.
How to Hold and Start an Angle Grinder
With the right attachment installed, your PPE on, and your workspace ready, you’re all set to start using your angle grinder. For beginners, this might be the most nerve-wracking step—but mastering proper posture and grip is actually simple.
1. Always Use Both Hands
Angle grinders pack a punch, especially when cutting hard materials—they can twist or kick back unexpectedly.
- Main Handle: Grip the body of the angle grinder with your dominant hand.
- Side Handle: Hold the auxiliary handle with your other hand—this can usually be moved to either side for comfort.
- Body Position: Stand with your feet shoulder-width apart, knees slightly bent, and keep your body angled away from the spinning disc to avoid kickback.
Always make sure the safety guard stays between you and the disc, even if you adjust its position for different tasks.
2. Start Smoothly—Don’t Jam the Switch
Let the grinder spin up to full speed before touching the disc to your workpiece (usually takes just a second or two). Making contact before it’s up to speed can cause the machine to jerk or jump.
Pro tip: Don’t force the grinder—let the disc do the work. Gentle, controlled pressure is all you need for clean results.
Cutting, Grinding, and Polishing Techniques
Depending on the attachment, your angle grinder can handle a variety of tasks. Here’s how to use it for the most common jobs:
Cutting
Cutting is one of the most popular uses for an angle grinder.
- Always use a cutting disc, not a grinding wheel—cutting discs are thinner and designed specifically for slicing.
- Mark your cut line with chalk or a marker.
- Position the disc at the edge of the workpiece, let it reach full speed, then ease into the cut.
- Guide the tool lightly—don’t force it. For thick materials, cut in stages to prevent overheating.
Grinding
Grinding removes surface material like weld spatter, rust, or burrs.
- Use a grinding wheel—these are thicker and more robust.
- Hold the grinder at a 20–30° angle to the surface.
- Apply gentle pressure and let the wheel do the work.
- Move steadily—don’t linger in one spot to avoid overheating or burning the material.
Polishing
For light repair or finishing, switch to a polishing pad.
- If your grinder has variable speed, use a lower setting.
- Apply a suitable polishing compound as needed.
- Keep the pad flatter, at a 10–15° angle to the surface.
- Work in overlapping circles with light pressure to ensure an even finish.
- Wipe away residue with a soft cloth as you go.
If the pad becomes loaded with residue or loses effectiveness, replace it with a clean one.
Shutting Down and Maintaining Your Angle Grinder
Don’t just toss your angle grinder onto the workbench when you’re done. Proper aftercare will extend its life and keep it safe for your next use.
1. Let the Disc Stop Completely
Release the trigger and wait for the disc to come to a full stop before setting the tool down. Setting it down while spinning can damage both the disc and your work surface.
2. Disconnect Power or Remove Battery
Always unplug the tool or remove its battery after use to prevent accidental starts during cleaning or when changing attachments.
3. Clean Off Debris
Use a brush, compressed air, or a cloth to remove:
- Metal shavings
- Dust from grinding or cutting
- Build-up in vents and crevices
A quick clean-up helps prevent overheating and electrical problems.
4. Inspect Discs and Attachments
- Discard any discs that are cracked, discolored, or worn thin.
- Check wire brushes and flap discs for bent wires or severe wear.
5. Check Power Cords and Batteries
Replace any damaged or exposed wires right away. Always use the manufacturer’s charger for batteries.
6. Store Properly
Keep your angle grinder in a dry, dust-free environment—never in a damp corner or under a pile of tools.
- Store discs away from moisture and sunlight; a storage case is best.
- Hang or box the tool to prevent accidental drops or knocks.

Common Angle Grinder Troubleshooting
Even with great habits, problems can crop up. Here are some typical issues and how to handle them:
Why Won’t My Angle Grinder Start?
If your angle grinder won’t start, it’s often due to a power supply problem or a stuck switch. First, check that the power cord or battery is properly connected and fully charged. For corded models, make sure the fuse and extension cord are working. Sometimes, dust can jam the trigger—try cleaning the switch gently. If your grinder still doesn’t work, don’t attempt to repair it yourself; contact a professional for inspection.
Why Is the Disc Wobbling or Shaking?
A disc that wobbles or shakes is usually loose, damaged, or warped. Unplug the grinder and check that the flange nut is tightened securely. Clean the spindle to remove any debris that might cause instability. If the disc continues to wobble after these steps, replace it with a new one immediately to avoid safety risks.
Why Is My Grinder Overheating?
Overheating typically occurs when the vents are blocked or the tool has been running for too long without a break. Stop using the grinder and allow it to cool down. Clean the vents using compressed air or a soft brush, and make sure you’re not blocking them during operation. Avoid applying too much pressure while working, as this can also cause the tool to overheat.
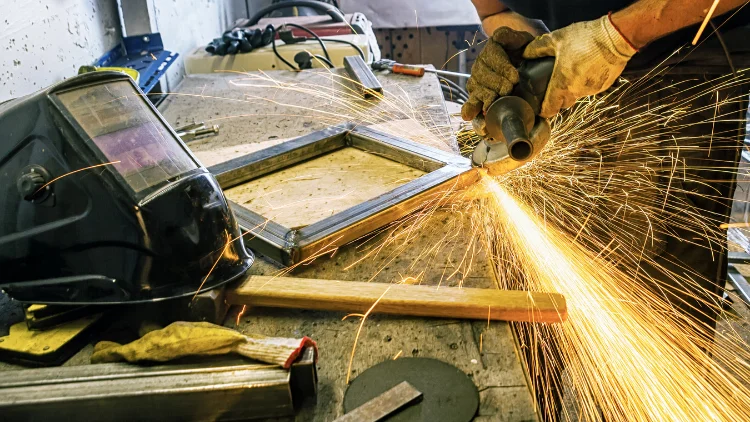
Is It Normal to See Lots of Sparks?
A small number of sparks are normal when using an angle grinder, but excessive sparks may mean you’re using the wrong disc or pressing too hard. Try reducing your pressure and make sure you have the right disc for the material you’re working with. Always position the safety guard to direct sparks away from yourself and anything flammable.
How Do I Prevent Disc Slippage?
Disc slippage usually happens if the flange nut isn’t tightened properly or if you’re using the wrong disc for your tool. Always unplug the grinder before checking, then retighten the nut securely. Make sure the disc matches the recommended size and type for your angle grinder.
Conclusion
Being able to use an angle grinder safely and efficiently is often what separates hobbyists from truly professional results.
With good habits and a little muscle memory, you’ll be able to tackle everything from cutting rusty bolts and smoothing welds to trimming tile edges with confidence.If you’re starting a new project or looking for a reliable angle grinder, KAFUWELL offers a complete range of grinders and attachments to help you tackle any challenge with ease.