If you need to drill holes in concrete or brick, you need power that a regular drill can’t match. A hammer drill uses rapid, hammering action to punch through tough material while spinning the bit.
This tool’s main job is to drill into surfaces that resist standard bits, like masonry, stone, or reinforced concrete. In this guide, you’ll learn where a hammer drill works best, when to use one, and how to get clean, fast results. Keep reading for tips on working safely, finding the right settings, and getting the most from your tool.
What Is a Hammer Drill?
A hammer drill is a power tool built to make holes in hard materials like brick, concrete, and stone. It combines the spinning action of a traditional drill with a pounding motion, which lets the bit break up tough surfaces as it rotates. This section looks at how a hammer drill works, what features to expect, and how it stands apart from standard drills.
How a Hammer Drill Works
Inside a hammer drill, two discs with ridges press against each other. As these discs spin, they slip and create a fast, back-and-forth action. This motion transfers straight to the drill bit, causing it to move in and out as it spins. The result is a chisel effect on the surface—a bit that pounds and twists at the same time.
- Impact action: Quick, repetitive blows break apart masonry and concrete.
- Rotational drive: The spinning motion removes debris and helps the bit bite into the surface.
- Variable modes: Most hammer drills let you turn off the hammer action for normal drilling in wood or metal.
This twin force is what allows a hammer drill to do jobs a standard drill can’t handle.
Main Features of a Hammer Drill
Hammer drills stand out with a few key design features that help them tackle heavy-duty work:
- Hammer mechanism: The internal cam or ridged disc is unique to hammer drills, producing thousands of impacts per minute.
- High power motors: Stronger than most regular drills, suited for hard surfaces.
- Adjustable speed and torque: Many models let you change speed and force for better control.
- Depth stop: A handy rod that ensures holes don’t go deeper than needed.
- Side handle: Adds grip and stability during tough jobs.
These features work together to help users drill clean, accurate holes in materials that would stop a normal drill.
How Hammer Drills Differ from Regular Drills
Hammer drills might look similar to standard models, but they have clear differences:
- Hammer action: Only hammer drills offer the pounding feature for masonry and stone.
- Build and materials: Hammer drills are heavier and often have reinforced housings to survive constant impacts.
- Applications: Regular drills handle wood, metal, and plastics. Hammer drills are made for tough surfaces and demanding tasks.
- Noise and vibration: Hammer drills create more vibration and noise than standard drills due to their internal hammering motion.
In short, a hammer drill isn’t just a stronger drill—it’s a different tool made for jobs where power and impact are both needed. For DIYers and professionals alike, it’s the right choice when a simple drill just won’t do.
Primary Uses of a Hammer Drill
A hammer drill shines when jobs demand force that a standard drill can’t provide. Its rapid pounding and spinning motion let it perform tasks that would burn out other drills. The tool is a staple in any serious tool kit because it bridges the gap between drilling and light demolition. Let’s look at the most common tasks where a hammer drill proves its worth.
Drilling into Concrete and Masonry
Concrete, brick, stone, and block are tough. Drilling into these materials with a standard drill is slow and rough on the tool and the bit. A hammer drill is designed for these jobs.
The tool’s hammer action drives the bit forward with quick, short strikes. These impacts shatter the dense surface, while the spinning action clears dust and chips. This combo lets you break into concrete and masonry without cracking or overheating the bit.
- Use a hammer drill for:
- Hanging shelves or cabinets on a concrete or brick wall
- Running wiring or piping through block walls
- Drilling pilot holes for lag bolts and anchors in stone
- The hammer setting is essential for anything denser than standard drywall or wood. Regular drills, even with masonry bits, often stall or fail in concrete.
A hammer drill makes neat, accurate holes in hard surfaces, saving time and reducing wear on bits.
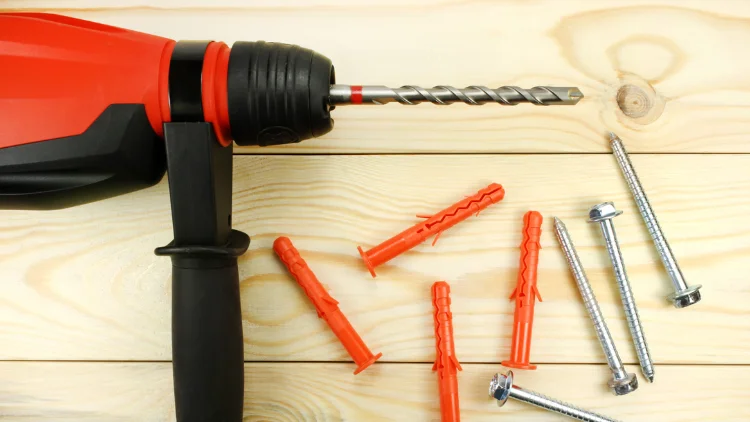
Making Holes for Anchors and Fasteners
Installing anchors or fasteners in stone or concrete requires precise, straight holes. Anchors expand inside the hole, gripping tight so screws or bolts won’t come loose. Only a clean, round hole provides the grip needed for true holding strength.
A hammer drill powers through masonry with control, making sure each hole is:
- The correct depth (often measured with a depth stop)
- The exact diameter needed for the anchor
- Free of dust and loose bits that could weaken the anchor’s hold
Common anchor types that need hammer drill holes include:
- Expansion anchors
- Sleeve anchors
- Tapcon screws
- Plastic wall plugs (in masonry)
These jobs demand both accuracy and the ability to cut into unforgiving material. The tool is standard for pros and DIYers mounting heavy objects on brick or concrete walls.
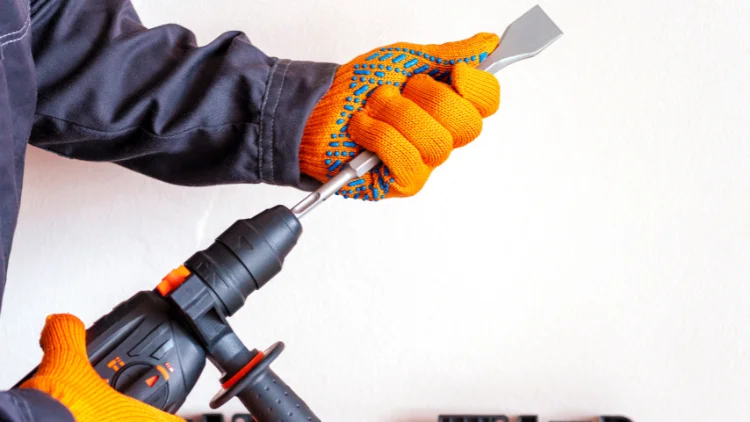
Light Demolition and Chipping Tasks
A hammer drill can do more than make holes. Many models double as light chiseling tools for tasks that are too much for hand tools but don’t need a rotary hammer. When set to hammer-only mode (on certain models), the tool can help with:
- Removing ceramic tiles from cement backer board or concrete
- Chipping away stuck mortar during brick repair
- Breaking off small sections of concrete or stone
It’s not meant for breaking thick slabs of concrete, but for small demolition jobs around the house or job site, a hammer drill speeds things up. Attach a pointed chisel bit or a flat spade blade to target trouble spots.
In these roles, the hammer drill is an all-rounder, tackling jobs where precision and punching force matter. This makes it a must-have for anyone working regularly with stone, brick, or concrete.
Tips for Using a Hammer Drill Safely and Effectively
Hammer drills are powerful tools that make tough jobs easier, but they also demand care and attention to detail. Using them the right way not only helps you work faster but also keeps you and your equipment in good shape. The following tips focus on safety, smart setup, and the right techniques to get the cleanest holes without mishaps.
Choose the Right Bit
The drill bit you use makes all the difference in both results and tool life. Masonry work requires a bit built to take the impacts and cut through hard materials.
- Use carbide-tipped bits for concrete, brick, and stone. These tips stand up to heat and impact.
- Pick the right size: Match your bit’s diameter and length to your anchor or fastener’s specs.
- Check the shank: SDS shanks fit rotary hammer drills, while standard round shanks fit most hammer drills. Make sure your bit matches your drill’s chuck.
- Keep a sharp bit for best results. Dull bits will work slower and cause more heat, risking damage to the tool and material.
- Don’t use wood or metal bits for masonry; they blunt fast and may break.
Always make sure the bit is seated tight in the chuck before you start.
Use the Hammer Function Correctly
Most hammer drills let you switch between regular drill mode and hammer mode. Use each as needed for the job.
- Hammer mode should be on for concrete, brick, block, and stone. This setting adds the impact needed to chip and bore through hard surfaces.
- Switch to normal drill mode for wood, metal, or plastics. Hammering these materials can cause cracks, overdrilling, or slipping.
- Some drills have a hammer-only mode for light chiseling. Only use this if your tool supports it, and keep the area clear of bystanders.
Set the drill to the correct speed. Low speed is better for larger bits and harder materials to keep control and reduce wear.
Safety Precautions
Personal safety and a smart workspace make all the difference in drilling jobs.
- Wear eye protection at all times. Masonry dust flies fast and can cause permanent injury.
- Use hearing protection. Hammer drills are loud, and the noise adds up over time.
- Wear a dust mask to avoid breathing in fine concrete or brick particles.
- Gloves offer grip and reduce the impact on your hands, but use snug-fitting types to avoid catching.
- Secure the workpiece. Never drill loose blocks or tiles.
- Clear the area of clutter. A tidy space reduces tripping and distraction.
- Check for hidden wires or pipes behind masonry before drilling. A stud finder with AC detection helps.
- Keep both hands on the drill. Use the side handle if available for extra control.
- Start slow, allowing the bit to find its path, and gradually increase speed.
- Pull the bit out occasionally to clear dust. This stops the bit from binding or overheating.
By following these guidelines, you keep your hammer drill performing well and protect yourself from injury. Pay attention to your tool and workspace, and you’ll get smoother, cleaner results with less effort.
Hammer Drill vs. Other Drills
When selecting a drill, it’s important to know how a hammer drill stacks up against standard drills and rotary hammers. Each tool has its place in construction and home repair. Understanding the differences in design, power, and main uses will help you pick the right one for your tasks.
Hammer Drills vs. Standard Drills
A hammer drill looks much like an ordinary drill at first glance, but inside, the mechanics serve a different purpose.
- Impact Mechanism: The key difference is the extra hammering action. While a standard (or “driver”) drill only spins the bit, a hammer drill strikes forward as it turns. This delivers sharp, repetitive blows against hard surfaces.
- Materials: A standard drill works well in wood, drywall, plastics, and metal with the right bit. In masonry or concrete, a standard drill struggles or fails because it lacks the force to break up the surface.
- Power and Build: Hammer drills often come with higher power ratings and stronger internal parts. They are built to take more punishment and run for longer periods under heavier loads.
- Versatility: Many hammer drills let you switch off the pounding action and use the tool as a regular drill. This means you can drill into metal or wood with the same tool when needed.
- Comfort and Handling: Hammer drills are heavier and create more vibration, so fatigue can set in faster if you use them for long periods on lighter materials.
In summary, if your job is mostly drilling into wood or metal, a standard drill is lighter, quieter, and easy to handle. If masonry or concrete comes into play, you need a hammer drill’s impact.
Hammer Drills vs. Rotary Hammers
Hammer drills and rotary hammers both excel in hard material, but their roles and designs are not the same.
- Hammering Force: Rotary hammers deliver much more impact energy than hammer drills. They use a piston system to drive the bit harder and deeper. This results in stronger, deeper blows—better for large holes and tough demolition.
- Tool Size and Power: Rotary hammers are bulkier, heavier, and usually run at higher watts or amps. Most use SDS chucks and bits that are locked in place for chipping and heavy drilling. A rotary hammer can often run all day on a construction site without overheating.
- Drilling Modes: Rotary hammers often handle three tasks: drill only, hammer only (for chiseling), and both at the same time. Most hammer drills support two modes: drill and drill with hammer.
- Tasks:
- Use a rotary hammer for drilling big holes (over 1/2 inch in diameter), breaking up concrete slabs, removing tiles in bulk, or chiseling brick and stone.
- Use a hammer drill for making anchor holes, pilot holes, or light demolition where deep, wide holes are not needed.
- Control and Precision: Hammer drills offer better control for small, accurate holes. Rotary hammers work best for speed over delicate work.
Which Tool Should You Use?
The right choice depends on your typical jobs:
- Light duty, fine holes in masonry: Hammer drill
- Heavy duty, large holes or demo work in concrete: Rotary hammer
- General work with wood, metal, and plastics: Standard drill
Below is a quick reference chart to sum up the core differences:
| Tool | Main Use | Typical Materials | Impact Strength | Versatility |
| Standard Drill | Wood, metal, plastics | Soft to medium surfaces | None | High |
| Hammer Drill | Masonry, small holes in concrete/brick | Hard surfaces | Moderate | Moderate to high |
| Rotary Hammer | Large holes, demolition | Concrete, stone, brick | High | Moderate |
Each tool holds a spot in a well-stocked workshop. Choose based on your needs: speed, material, hole size, and comfort during use. Proper selection leads to better results, longer tool life, and less frustration on the job.
Read more: What Is the Best Power Tool Brand?
Conclusion
A hammer drill brings the right mix of speed and impact for tough surfaces like concrete and brick. Its true value shows when standard drills slow down or wear out. For jobs that need solid anchor holes or quick masonry work, this tool stands out for both power and control.
If you are getting your first hammer drill, start with a model that matches the materials you work with most. Pay attention to features like speed settings and a good side handle for stable drilling. Safety gear and the right bit matter just as much as the drill itself.