Using sharpening stones is actually a skill that’s easy to master. You just need to learn some basic knowledge about the stone, pick up a few simple techniques, and add a bit of practice and patience. After reading this article, you’ll find that learning this skill is much easier than you might have thought.
Types of Sharpening Stones
Before diving into the sharpening process, it’s important to understand the different types of sharpening stones. Depending on your needs, there are various types, each with its own advantages.
Water Stones
Water stones are the most commonly used sharpening stones, especially for beginners. To use them, simply soak the stone in water for about 10-15 minutes before you start sharpening. Water stones have a smooth surface and provide a fine cutting effect. However, they wear down quickly, so they require regular maintenance and flattening.
Oil Stones
Oil stones use oil as a lubricant, making them more durable than water stones. They’re perfect for fine polishing edges and can effectively prevent metal shavings from clogging the surface, ensuring smoother sharpening and a longer lifespan.
Diamond Stones
Diamond stones are very hard and provide fast cutting speeds, making them ideal for those who need high efficiency and durability. They don’t require soaking or additional lubricants, making them convenient and low-maintenance. However, they tend to be more expensive.
Choosing the Right Sharpening Stone
When selecting a sharpening stone, consider the type of knife and how frequently it is used. I recommend oil stones because they last longer, are less likely to wear out or deform with frequent use, and provide a smooth, sharp edge.
They’re ideal for knives, chisels, and plane blades, and they meet the durability and efficiency needs of both homeowners and professionals. Plus, they’re reasonably priced.
Additionally, the grit of the sharpening stone is crucial. The lower the grit (200-600), the coarser the surface, allowing for faster sharpening but potentially less precision. Higher grits (800-1000) provide finer particles, offering better polishing results but slower sharpening speeds.
Low-grit stones are good for fixing damaged edges, while high-grit stones are perfect for fine polishing, refining edge angles, and maintaining sharpness.
Step-By-Step Guide To Using A Sharpening Stone
Now that you’re familiar with the different types of sharpening stones, it’s time to move on to the actual sharpening process.
Preparing the Sharpening Stone
- Water Stone: Before use, fully soak the stone in water for about 10-15 minutes until no bubbles rise. This helps lubricate the surface and prevents metal shavings from clogging the stone.
- Oil Stone: Before use, apply a thin layer of oil to the stone, covering the surface evenly. There’s no need to soak it.
- Diamond Stone: No water or oil is required—just use it dry.
Additionally, it’s important to check if the surface of your sharpening stone is flat. An uneven surface can cause uneven sharpening, make it hard to maintain the correct angle, and even damage your knife.
If the sharpening stone is uneven, you can use a diamond plate or a flattening stone to smooth it out. Simply rub the diamond plate in a circular motion over the stone’s surface until it’s flat again.
Setting Up Your Sharpening Station
Find a well-lit, spacious area, such as a countertop or table, where you can easily work with both the knife and the sharpening stone.
Place the sharpening stone on a non-slip surface, such as a sharpening stand with a rubber base, or put a damp towel under the stone to prevent it from sliding and ensure stability and safety.
Lay a towel or tray under the sharpening stone to catch any excess water, oil, or metal shavings for easy cleanup.
Stand in front of the sharpening stone, making sure you can comfortably adjust the angle and pressure while keeping your movements steady.
Mastering the Right Angle
One of the most important aspects of sharpening is maintaining the correct angle between the knife edge and the sharpening stone. Here are some common angle recommendations:
- Kitchen Knives: Recommended 15-20 degrees, ideal for everyday kitchen knives.
- Outdoor or Utility Knives: Recommended 25-30 degrees, which are more durable but slightly less sharp.
How to Find the Right Angle
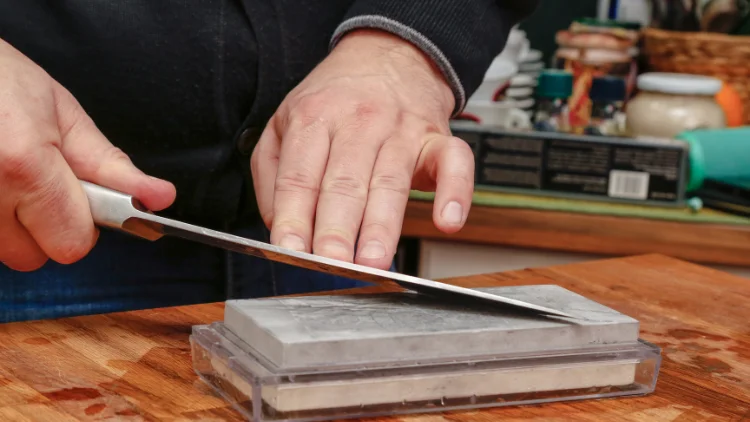
Tilt the blade slightly to form a “V” shape. Check the contact marks on the edge to ensure it’s fully in contact with the sharpening stone. You can use the thickness of your finger or a coin as a reference to raise the blade about 1-2 cm to approximate a 20-degree angle. Beginners may use an angle guide to help maintain a consistent angle throughout.
Starting to Sharpen the Knife
If you’re using a double-sided sharpening stone, begin with the coarse side (like 100 or 600 grit) to reshape the edge, and then switch to the finer side (like 800 or 1000 grit) to polish it. Choose the grit based on the condition of the knife edge—if it’s severely dull or has chips, start with a lower grit to fix it.
Step 1: Stabilize the Knife Angle
Place the knife at the desired angle (such as 20°) on the sharpening stone. Hold the handle with one hand and gently press down on the back of the knife with the other hand, ensuring the edge is in full contact with the stone at the correct angle.
Step 2: Slide from Base to Tip
With smooth, consistent motions, slide the knife from the base (near the handle) toward the tip. Keep the motion slow and steady, allowing the entire edge to make contact with the stone.
The edge should be in full contact with the stone along its entire length, starting from the base and following the curve to the tip. You can slightly adjust your wrist to keep the edge steady.
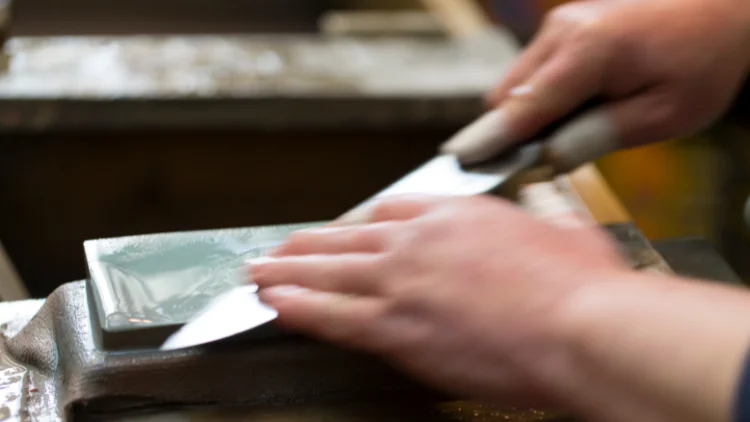
Step 3: Maintain Even Pressure
Apply light but consistent pressure as you move the knife. Avoid pressing too hard, which could damage the edge or wear out the stone prematurely.
Light pressure is key: Beginners often apply too much force, which can wear down the edge too much or cause an uneven angle. Just make sure the edge makes full contact with the stone, without forcing it.
When pushing the knife, apply a little pressure; when pulling it back, release the pressure to avoid over-sharpening one spot.
Step 4: Repeat the Motion
Repeat the sliding motion about 10-15 times, depending on how dull the edge is. Ensure each pass covers the entire length of the blade.
Flip the Knife and Sharpen the Other Side
Once you’ve finished one side, flip the knife over and sharpen the other side using the same angle and pressure. Keep the motion the same as on the first side to maintain symmetry.
Make sure you apply the same number of strokes and pressure to both sides to create an even, sharp edge.
Special Tips for Sharpening the Tip
For the tip, especially if it’s curved, adjust your wrist angle slightly to make sure the curved part of the edge makes full contact with the stone. Focus on the edges of the sharpening stone to refine the tip while keeping the angle steady to avoid uneven wear.
Once you’ve finished, you can use a leather strop to gently remove any fine burrs and further polish the edge for added sharpness.
Additional Sharpening Techniques
Z-Pattern Sharpening:
For longer blades, use a “Z” motion. Slide the blade in an arc from the base to the tip, ensuring that the entire length of the edge is evenly sharpened.
Segmental Sharpening:
If you find it difficult to cover the entire length of the blade in one pass, divide the blade into sections (base, middle, and tip). Sharpen each section separately and then blend them together to avoid missing any spots.
One-Way vs. Two-Way Sharpening:
- One-Way Sharpening: Slide the blade in one direction (from base to tip), lift the knife, and then return to the starting point to begin the next pass. This method helps create a smoother edge.
- Two-Way Sharpening: This involves a push-pull motion (from base to tip, then from tip back to base). This method is faster, but you must maintain consistent pressure to avoid excessive wear on the blade.
Checking the Knife After Sharpening
Smoothness Check
Gently run your fingertip along both sides of the blade (be careful not to touch the edge directly) to check for any burrs or rough spots. If you feel any roughness, continue sharpening with a higher-grit stone or a leather strop.
Paper Cutting Test
Use the blade to cut a piece of paper and see if it cuts smoothly. If the blade easily slices through the paper, the sharpening is successful.
Light Reflection Test
Hold the blade under a light and observe its edge. If you notice any reflections, it means some areas are still dull, and you should continue adjusting the edge.
Cleaning and Maintenance
Wipe the blade with a damp cloth to remove any remaining metal shavings and lubricant.
If you’re using an oil stone, use a paper towel to clean off any excess oil.
Apply a light coat of protective oil to the blade to prevent rust.
Clean the sharpening stone thoroughly and store it properly for future use.
Conclusion
Sharpening a knife may seem like a daunting task, but with the right tools and a little practice, anyone can master it with ease.If you don’t have the right sharpening stone yet, or if you’re looking for a stone that can handle various sharpening needs, be sure to check out the high-quality dual-sided sharpening stones selected by Kafuwell. Each stone features two different grits, allowing you to perform both coarse grinding and fine polishing, helping you effortlessly achieve a sharp edge.